Make contemporary Do-it-yourself Mochi (Japanese rice muffins) utilizing a stand mixer and an electrical rice cooker! Stuff the mochi together with your favourite dessert filling, dip it in a savory or candy coating, or get pleasure from it in pink bean soup or Japanese New 12 months soup (ozoni).
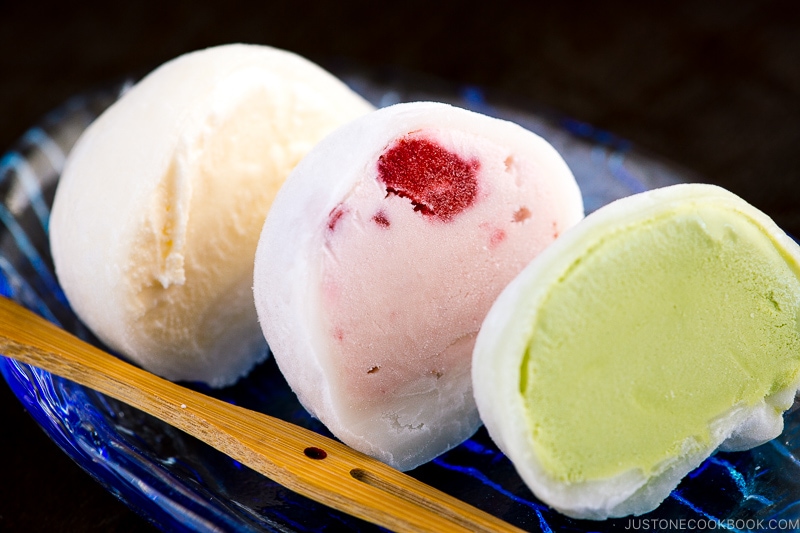
Sticky and chewy Mochi (餅) is irresistible. Whether or not it’s Mochi Ice Cream, Strawberry Daifuku Mochi, or mochi loved throughout conventional Japanese New 12 months, these elastic wonders of glutinous rice muffins have captured the hearts of individuals worldwide. Within the US, you’ll be able to even discover the mainstream mochi creations at main grocery shops like Dealer’s Joe and Complete Meals.
Right this moment I’ll present you easy methods to make contemporary do-it-yourself mochi with a rice cooker and a stand mixer. It’s a pretty straightforward affair, however I do wish to warn you – mochi is tremendous sticky and the method generally is a handful. Don’t let that cease you although as a result of there’s nothing like consuming freshly pounded mochi! They’re easy, springy, and tactile. A nostalgic reminder of my childhood and all of the joyful reminiscences in Japan.
What’s Mochi?
A enjoyable reality: Mochi (餅, もち) is commonly pronounced as [MO-chi] in English, however we really pronounce it [mo-CHI] in Japanese.
Mochi is a Japanese rice cake fabricated from mochigome (糯米), a short-grain glutinous rice*. It’s naturally white, sticky, elastic, and chewy. It tastes like rice with out filling or coating, however mochi is all concerning the texture. There is no such thing as a different meals that has this distinctive texture just like mochi.
Outdoors of Japan, mochi appears to be related to desserts like mochi ice cream and mochi filled with a candy filling. Nevertheless, when the Japanese hear the phrase “mochi”, it normally implies the plain mochi that can be utilized for each savory and sweets. Consider it this manner: if steamed rice is one type of rice, then mochi is one other type of rice.
*It’s typically known as “candy rice” though they each imply the identical factor. I’d simply name “glutinous rice” on this put up.
How Mochi is Made
Historically, glutinous rice is first steamed, then transferred right into a usu (臼), a big Japanese stamp mill, and pounded with a pestle known as kine (杵). This mochi-pounding occasion is known as mochitsuki (餅つき).
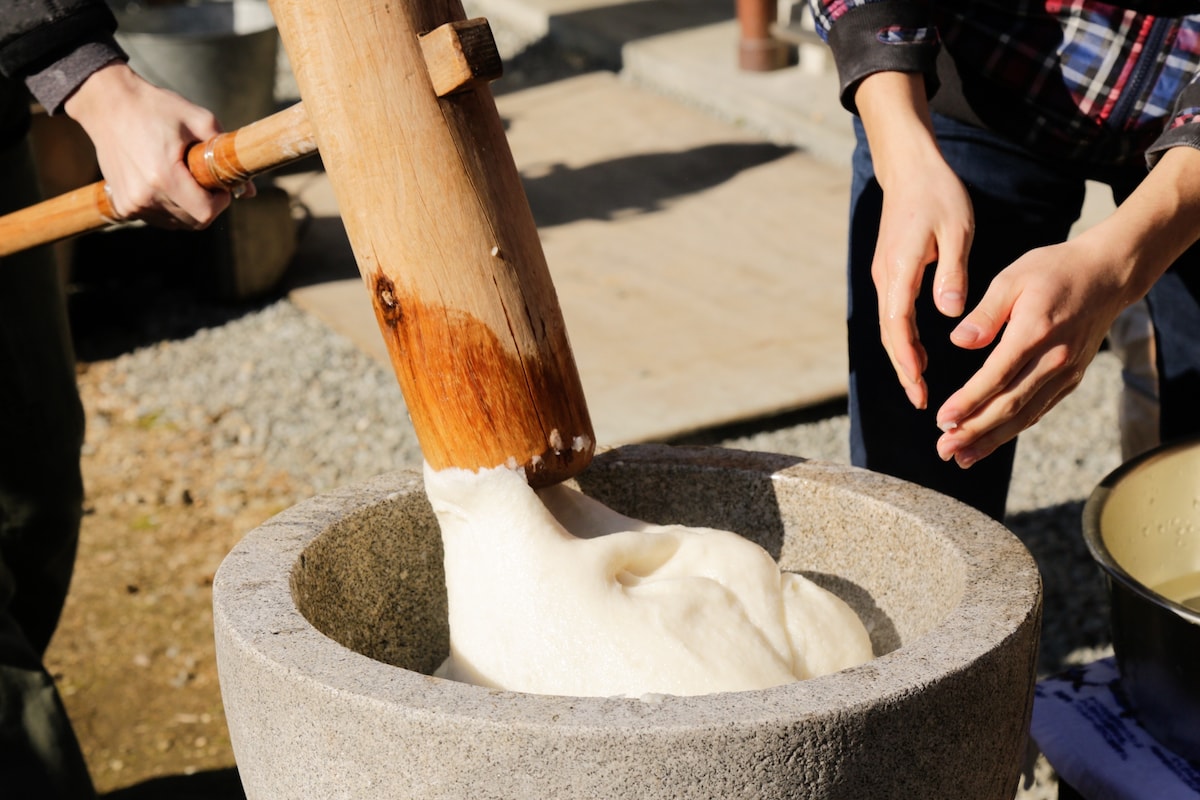
The glutinous rice is pounded repeatedly till easy, sticky, and elastic. Some households personal a bread machine with a “mochi making” perform, which may cook dinner and pound the glutinous rice (Isn’t it genius?). Some folks even personal a mochi-pounding machine. Outdoors the large cities, folks nonetheless make mochi the normal method utilizing the household’s heirloom usu and kine. Mochitsuki is a household occasion that they proceed on.
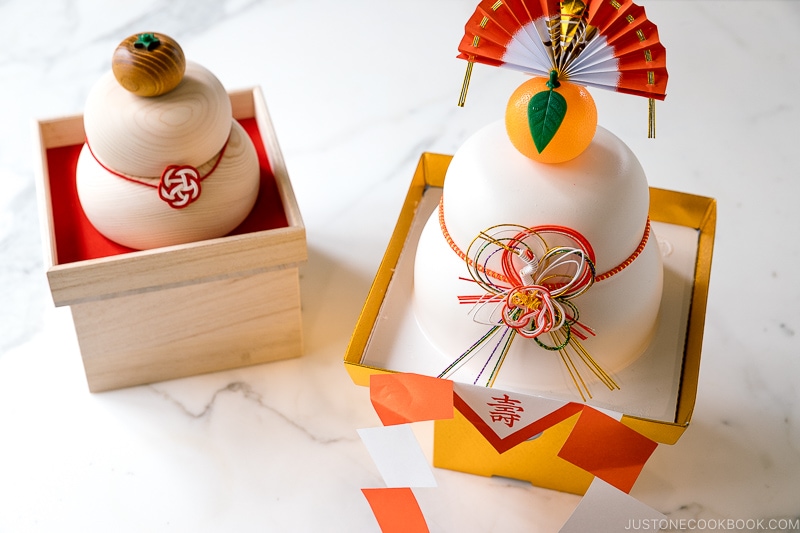
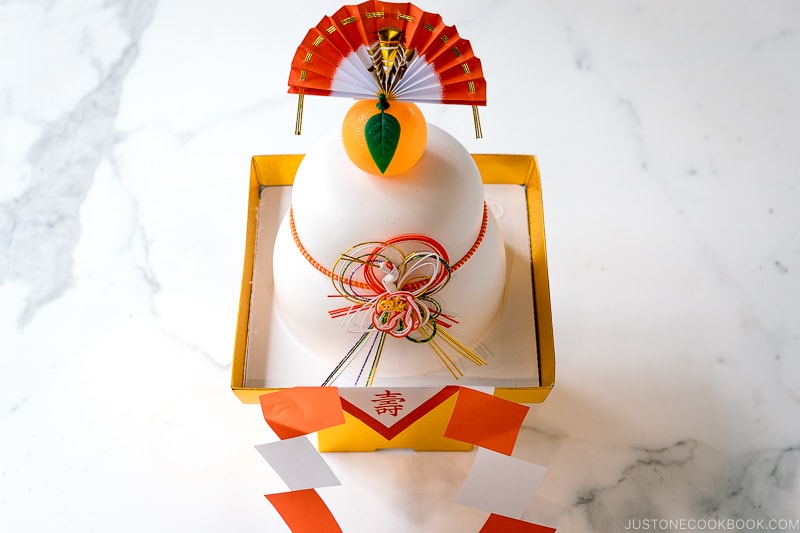
After the mochi is pounded, it’s transferred to a working station the place you form it into spherical mochi balls or make massive spherical items used for a ornament known as kagami mochi (鏡餅) throughout the Japanese New 12 months. Making mochi is an enormous a part of Japanese New 12 months preparation.
Right this moment we are going to make contemporary mochi with a rice cooker and a stand mixer!
Preserve in Thoughts:
- Mochi is a particularly sticky meals. Embrace the gooeyness and have enjoyable!
- Don’t contact mochi together with your naked fingers/utensils. When kneading and pounding, at all times moist your fingers and utensils. When shaping mochi, be sure your fingers are dry and calmly dusted with starch.
- Soak the bowls and instruments in water instantly. Mochi will come off simply by the point you clear up.
The right way to Make Mochi with a Stand Mixer (3 Steps)
- Cook dinner glutinous rice in a rice cooker (or no matter methodology you employ) – Simple
- “Knead” and “Pound” the cooked rice with a stand mixer. – Pretty straightforward
- Divide and make mochi balls – Mess alert! (simply kidding, you are able to do it)
Observe: As a substitute of utilizing mochiko (glutinous rice flour), we are going to cook dinner glutinous rice to make the dough on this recipe so it yields the freshest style.
Step 1: Cook dinner Glutinous Rice
I made a decision to make use of a rice cooker methodology because it’s an ordinary electrical equipment should you cook dinner Japanese or Asian meals continuously.
Rice Cooker: You do not want to soak the glutinous rice in water previous to cooking. Simply rinse and cook dinner the glutinous rice similar to you’ll with common steamed rice.
Steamer: Historically, glutinous rice is steamed in a steamer as a result of it’s thought of the easiest way. You’d rinse and soak the rinsed glutinous rice in water in a single day, put the rice in cheesecloth, place it contained in the steamer, and steam for half-hour.
On the spot Pot: You need to use your On the spot Pot when you have one. Soak the glutinous rice for 1 hour after rinsing, high-pressure cook dinner for five minutes, and pure launch for Quarter-hour.
Pot on Range: Rinse the glutinous rice, soak for 10 minutes, then put the rice and water within the pot. Begin with excessive warmth, and as soon as boiling, combine the rice as soon as and put the lid on. Flip the warmth right down to the bottom setting and cook dinner for 8-10 minutes. Take away from the warmth and let it steam for 10-Quarter-hour.
Step 2: “Knead” and “Pound” Utilizing a Stand Mixer
At this step, you’ll need a couple of issues:
- A KitchenAid® stand mixer – Skilled collection (That is the one equipment that I’ve tried making mochi efficiently many instances)
- A timer (your smartphone would do)
- Scorching water prepared to be used
- Silicone spatula (A versatile silicone spatula is straightforward to scrape down the mochi within the stand mixer)
- A 2-cup measuring cup for soaking the spatula
This stand mixer course of entails 2 phases:
- Knead with a dough hook for 3 minutes – repeat 4 instances [total 12 minutes]
- “Pound” with a flat beater for 30 seconds – repeat 4 instances [total 2 minutes]
Step 3: Shaping Mochi Balls
Right here’s what you’re going to do:
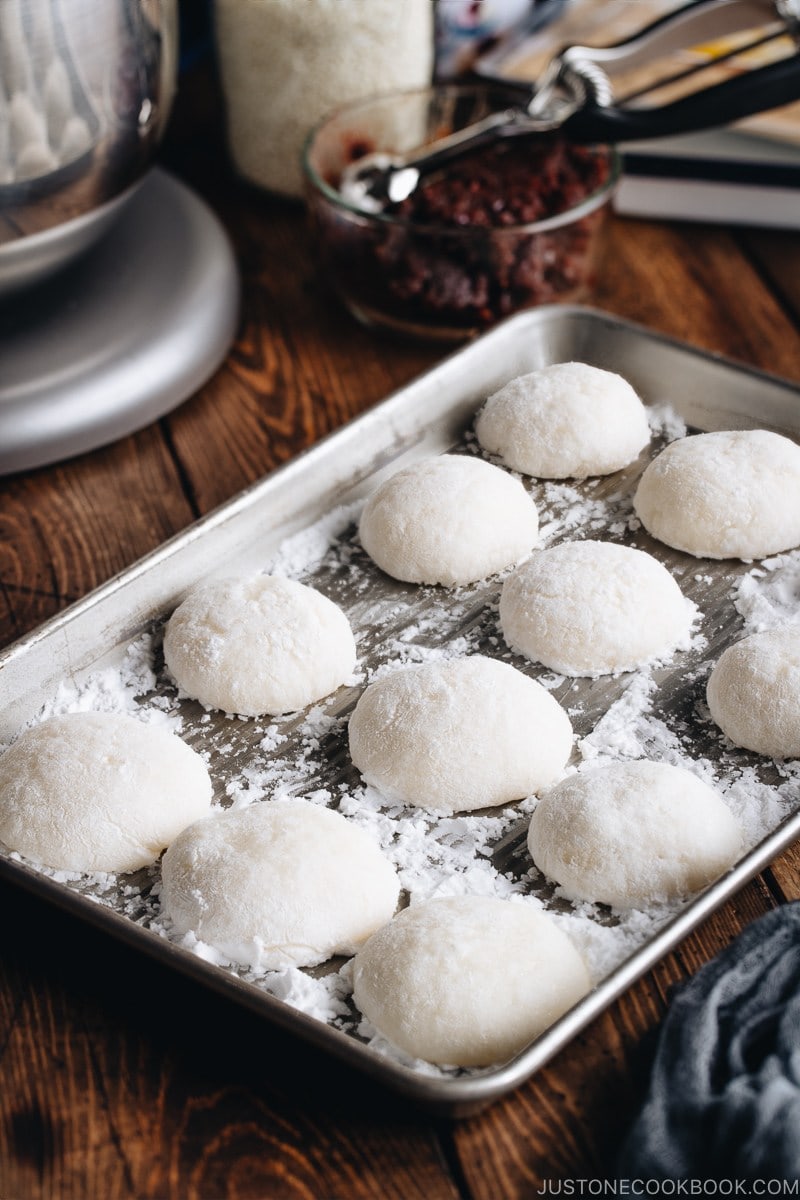
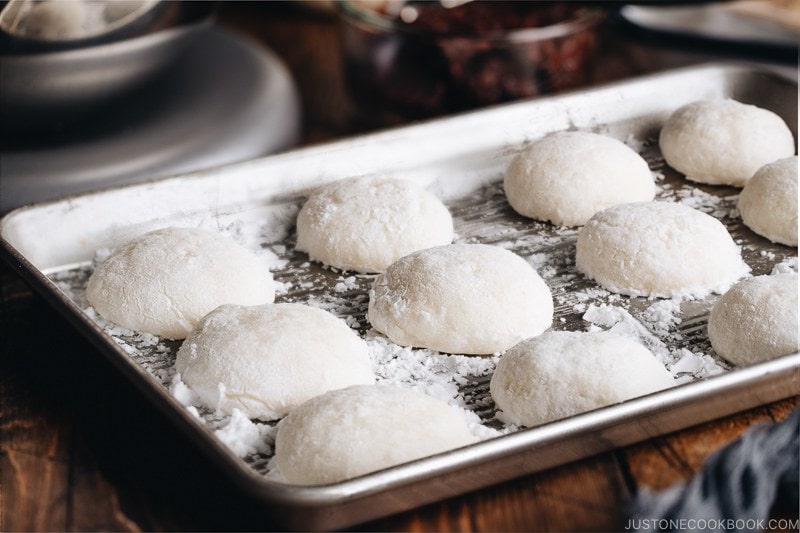
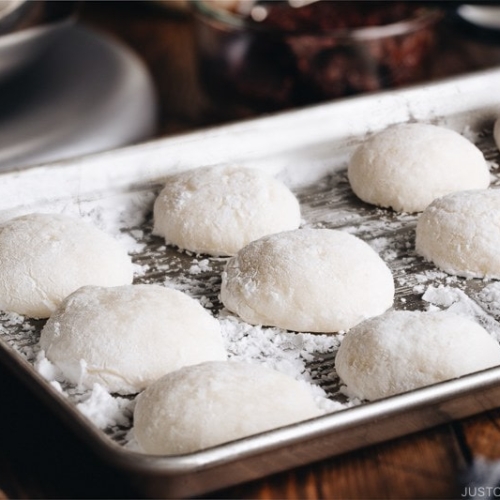
1. Prep your work floor and two rimmed baking sheets. Thinly coat the mochi dough with potato starch (or cornstarch).
2. Pull up a nook and tuck within the edges beneath to create a small mound. Preserve pulling and tucking till it’s thick sufficient.
3. Make a “C” together with your well-dusted, left pointing finger and thumb, after which place the “C” fingers on high of the thick nook.

3. Along with your proper hand, tuck and squeeze the mochi into the left “C” fingers from beneath and facet to make a ball form.
4. When you get a good-size ball form that’s barely greater than a golf ball, pinch the mochi together with your left “C” fingers. Use the best hand to twist it off.
When pinching, don’t pull the mochi as a result of the sticky floor would seem and your fingers would get messy. As a substitute, use a pinch & twist movement to lower the mochi with two “C” fingers and proper hand. Ensure that your fingers are dry and well-dusted with potato starch.
5. Shortly rotate the mochi on dusted hand to cowl up the sticky new floor.
REMINDER:
- Deal with the areas dusted by starch solely and ensure your fingers are dry and well-dusted.
- Do to not “pull” the mochi, which creates a contemporary sticky floor.
- If you happen to see any sticky floor showing on mochi, calmly mud a skinny layer of starch and brush the surplus away. An excessive amount of starch can be troublesome while you stuff the filling and shut the mochi.
*Please watch my video. Typically it’s simpler to see in motion than studying my directions.
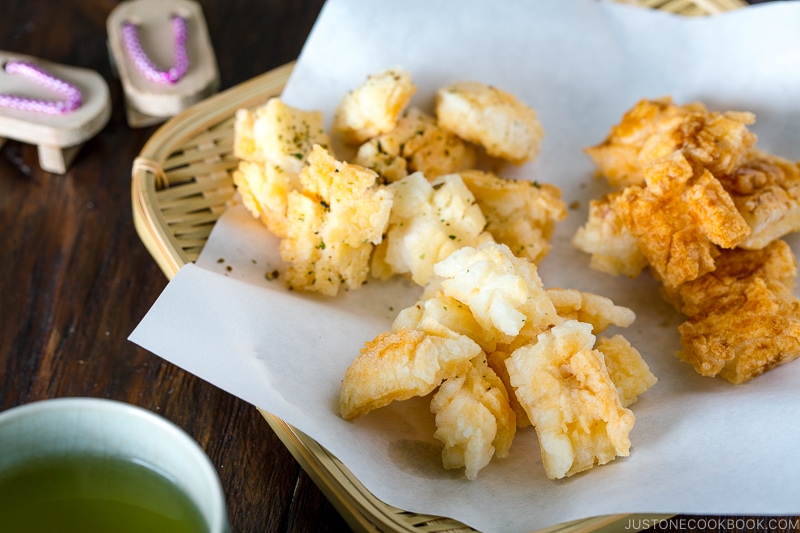
5 Methods to Take pleasure in Do-it-yourself Mochi
There are such a lot of methods to get pleasure from contemporary do-it-yourself mochi. Listed below are some frequent methods to get pleasure from it.
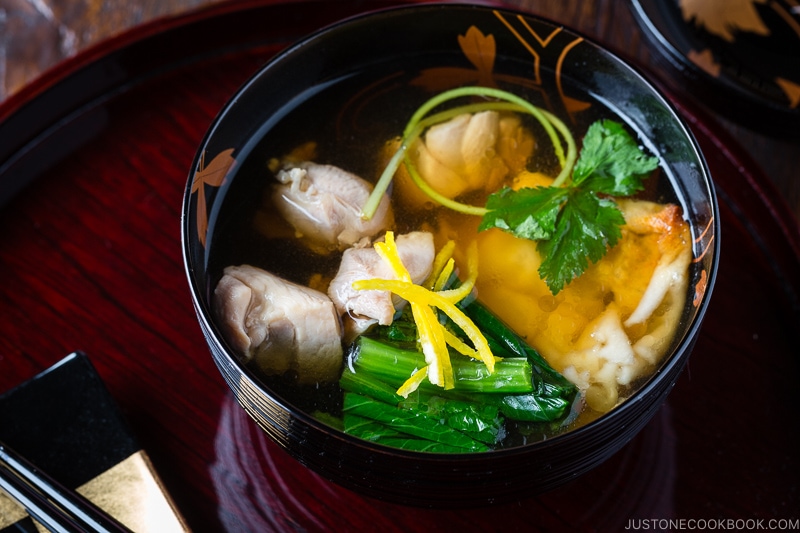
1. Put mochi in a soup
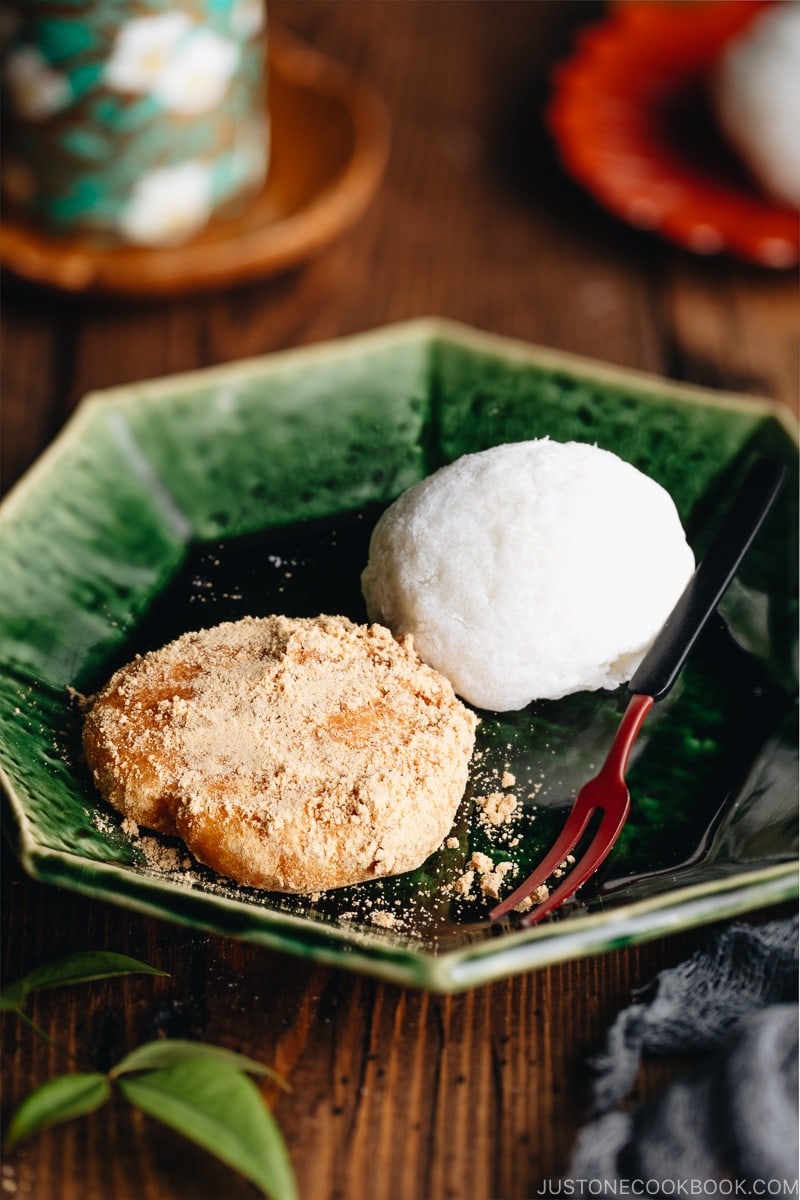
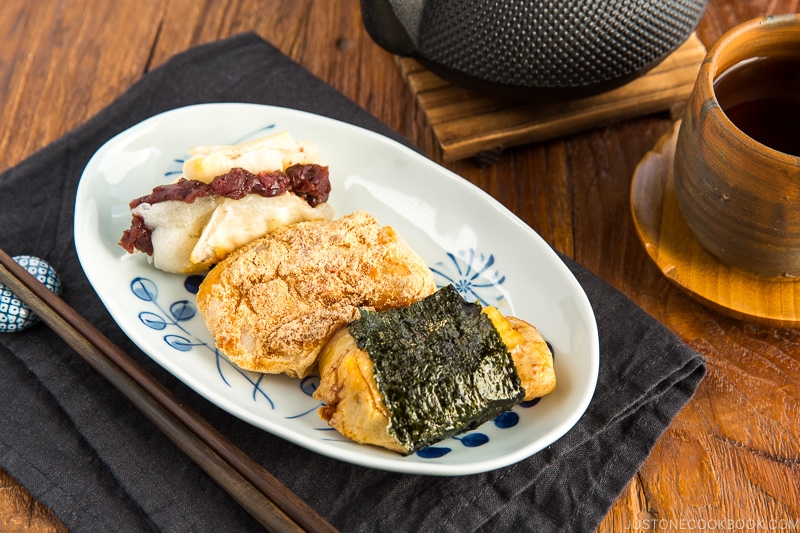
2. Stuff mochi with a candy filling
3. Coat mochi with a candy/savory sauce
4. Make mochi into Japanese New 12 months ornament
5. Make mochi into rice crackers
- Make it flat and air dry till fully dry. Then toast the mochi on each side within the oven. Brush with soy sauce and air dry. See my Rice Cracker (Kaki Mochi) recipe.
Regularly Requested Questions
1. Can I exploit different varieties of rice?
No, for this recipe, I solely tried with Japanese short-grain glutinous rice (candy rice) or what we name, mochigome (もち米).
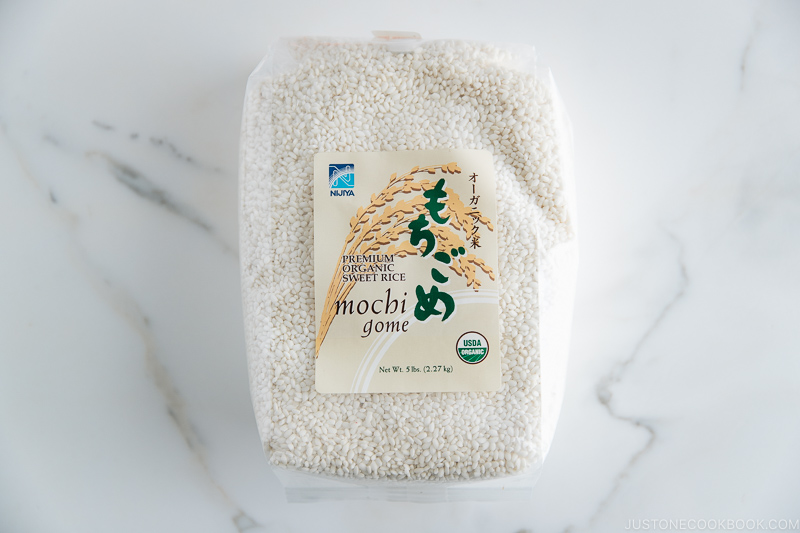
I had by no means tried different varieties of rice similar to long-grain glutinous rice, due to this fact I’d not know the way a lot water you could cook dinner the rice, how lengthy it takes to knead/beat, and so forth.
2. Can I make a much bigger batch?
To be trustworthy, I’m not so positive as a result of I don’t assume my Kitchen Assist stand mixer would be capable to knead extra mochi contained in the bowl. With 3 rice cooker cups of glutinous rice, it was working laborious, and I wouldn’t really feel comfy doing even a much bigger batch. So I’d counsel making a couple of batches.
3. How can I preserve mochi softer for a very long time?
The reply is sugar. If you happen to plan to make candy mochi similar to daifuku mochi, then you must add sugar. I researched, and it recommends utilizing 50-100 grams of sugar for 100 grams of cooked glutinous rice. You will have so as to add sugar whilst you’re kneading the mochi. Begin with 50 grams and enhance the quantity as you want. The extra sugar you added, the longer the mochi stays smooth.
4. Can I freeze the mochi? How lengthy does it final?
Sure, you’ll be able to freeze the mochi! For the highest quality, eat it inside a month, however mochi may be stored within the freezer for six months should you retailer them effectively.
5. Does it style like freshly pounded mochi made with the normal methodology utilizing usu and kine?
I want! The stand mixer can not do an actual “pounding” movement and the mochi shouldn’t be 100% made in the identical method. Nevertheless, if my selection was between store-bought mochi vs. do-it-yourself mochi, I’d select to make contemporary mochi in my stand mixer. It’s really superb! The mochi’s texture is 95% near those made historically. I simply want that it yields an actual easy and silky floor. That stated, the distinction shouldn’t be apparent.
Able to make some mochi from scratch? Time to assemble your youngsters or mochi-loving mates for this sticky, enjoyable and auspicious exercise!
Different Mochi Recipe

Matcha Inexperienced Tea Mochi – This recipe makes use of glutinous rice flour and matcha powder, and it’s completely chewy with a touch of earthy sweetness.
Want to study extra about Japanese cooking? Join our free publication to obtain cooking ideas & recipe updates! And keep in contact with me on Fb, Pinterest, YouTube, and Instagram.
The right way to Make Mochi with a Stand Mixer
Make contemporary Do-it-yourself Mochi (Japanese rice muffins) utilizing a stand mixer and an electrical rice cooker! Stuff the mochi together with your favourite dessert filling, dip it in a savory or candy coating, or get pleasure from it in pink bean soup or Japanese New 12 months soup (ozoni).
Servings: 16 small mochi balls
Components
For the Anko Mochi (optionally available)
For the Kinako Mochi (optionally available)
Forestall your display from going darkish
Directions
Earlier than You Begin…
-
I created this recipe utilizing the KitchenAid Skilled collection stand mixer. I can not assure that different tools will work, as I’ve not examined it. Please don’t use a hand mixer to make this recipe, because the motor shouldn’t be highly effective sufficient to deal with mochi. You may at all times pound the cooked glutinous rice with a picket mallet.
To Measure and Rinse the Glutinous Rice
-
Measure 2¼ cups candy rice/glutinous rice (mochigome). Tip: One rice cooker cup (180 ml) of raw glutinous rice is 150 g or ¾ US cup. You will have 3 rice cooker cups (540 ml, 450 g) for this recipe.
-
To rinse the glutinous rice, put the rice in a big bowl and add some water. Stir together with your fingers and rapidly drain the water.
-
Then, gently stir the rice together with your fingertips. Glutinous rice breaks simply, so don’t apply any additional strain. Simply calmly stir it a couple of instances.
-
Add extra water to the bowl and thoroughly rinse. Repeat rinsing 3–4 extra instances. Drain the rice in a fine-mesh sieve.
-
Shake the sieve to take away the surplus water. Then, switch the rice to the inside pot of a rice cooker.
-
Even the extent of the rice within the pot and add 1⅔ cups water. The water degree needs to be on the inside pot‘s 3-cup line for Candy Rice. Evenly distribute the rice with chopsticks or your fingers.
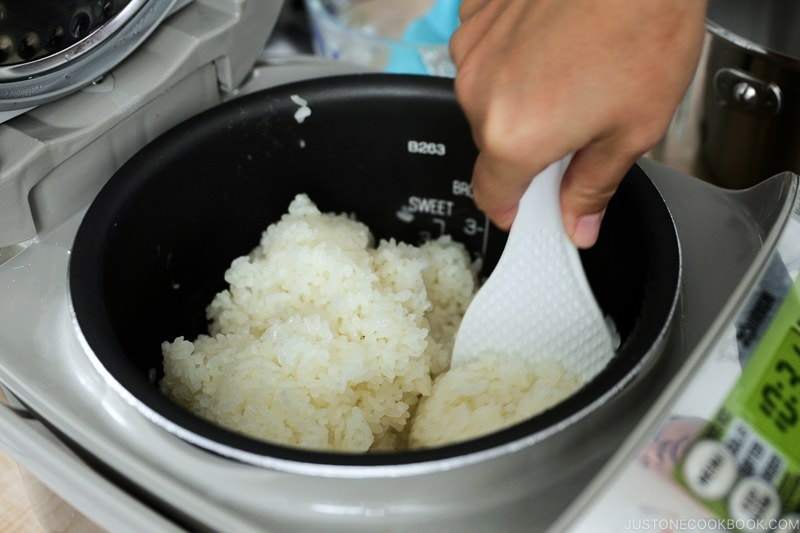
To Cook dinner the Glutinous Rice
-
Shut the lid of the rice cooker. Choose Common on the menu and begin cooking. Common mode cooking is normally 5–10 minutes longer than the Candy Rice setting. When the rice is completed cooking, we will take it out instantly.
-
When the rice is nearly executed, put together about 4–5 cups of boiling water. As soon as the recent water is prepared, pour one-third of the boiled water into your stand mixer bowl to heat it up, one-third right into a mixing bowl to heat a dough hook and flat beater, and the remaining right into a 2-cup measuring cup to maintain a silicone spatula moist. Ensure that there’s sufficient scorching water to submerge all of the instruments.
-
As soon as the mixer bowl is heat, discard the recent water. Then, switch all of the cooked glutinous rice into the stand mixer bowl.
To Knead with the Dough Hook Attachment
-
Set the dough hook attachment on the stand mixer. Begin kneading the glutinous rice on Velocity 2. Set a timer for 3 minutes (first spherical).
-
The dough hook will begin pulling within the rice.
-
Tip: Whereas kneading, you should utilize your moist silicone spatula to detach the glutinous rice from the wall of the stand mixer bowl.
-
When the 3-minute timer beeps [03:00], take away the bowl from the stand mixer, protecting the dough hook hooked up. Utilizing the moist silicone spatula, flip over the glutinous rice. Dip the spatula within the water a couple of instances so it doesn’t stick with the rice.
-
Set the bowl again onto the stand mixer and begin kneading once more on Velocity 2. Reset the timer for 3 minutes (second spherical).
-
When the 3-minute timer beeps [06:00], take away the bowl from the stand mixer and flip the glutinous rice once more, utilizing the moist silicone spatula. Now, the rice grains are much less seen and are beginning to appear to be mochi.
-
Put the bowl again onto the stand mixer and begin kneading once more on Velocity 2. Reset the timer for 3 minutes (third spherical).
-
When the 3-minute timer beeps [09:00], take away the bowl from the stand mixer and flip the glutinous rice once more, utilizing the moist silicone spatula. Now it’s getting stickier and elastic.
-
Put the bowl again onto the stand mixer and begin kneading once more on Velocity 2. Reset the timer for 3 minutes (fourth spherical).
-
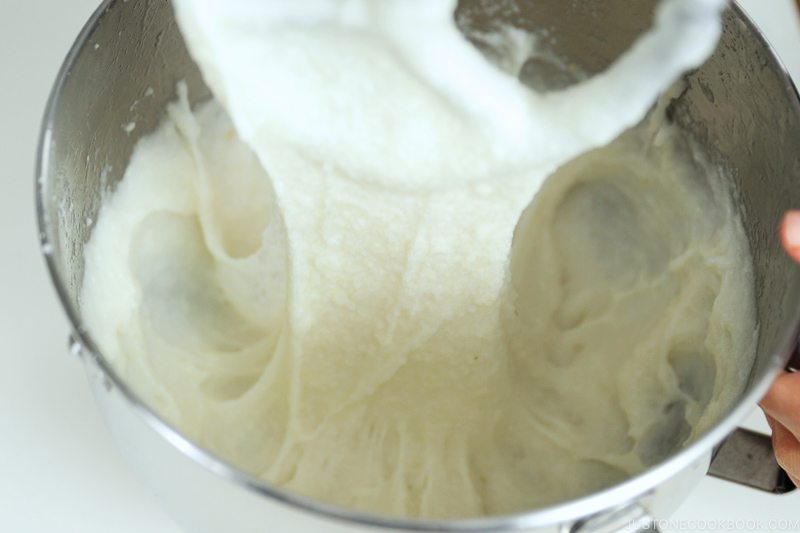
When the 3-minute timer beeps [12:00], take away the bowl from the stand mixer and flip the glutinous rice once more, utilizing the moist silicone spatula. Now the kneading is full.
To “Pound“ with a Flat Beater Attachment
-
Take away the dough hook attachment from the stand mixer and alter to a flat beater attachment.
-
Beat the mochi on Velocity 3. Set the timer for 30 seconds (first spherical).
-
When the 30-second timer beeps [00:30], don’t take away the bowl from the stand mixer. Scrape the mochi as a lot as you’ll be able to from the perimeters of the bowl, utilizing the moist silicone spatula.
-
Reset the timer for 30 seconds (second spherical). Begin beating once more on Velocity 3. When the 30-second timer beeps [01:00], scrape the mochi once more from the perimeters of the bowl, utilizing the moist silicone spatula.
-
Reset the timer for 30 seconds (third spherical). Begin beating once more on Velocity 3. When the 30-second timer beeps [01:30], scrape the mochi once more from the perimeters of the bowl, utilizing the moist silicone spatula.
-
Reset the timer for 30 seconds (fourth spherical). Begin beating once more on Velocity 3. When the 30-second timer beeps [02:00], scrape the mochi once more from the perimeters of the bowl, utilizing the moist silicone spatula. Now, the pounding is completed.
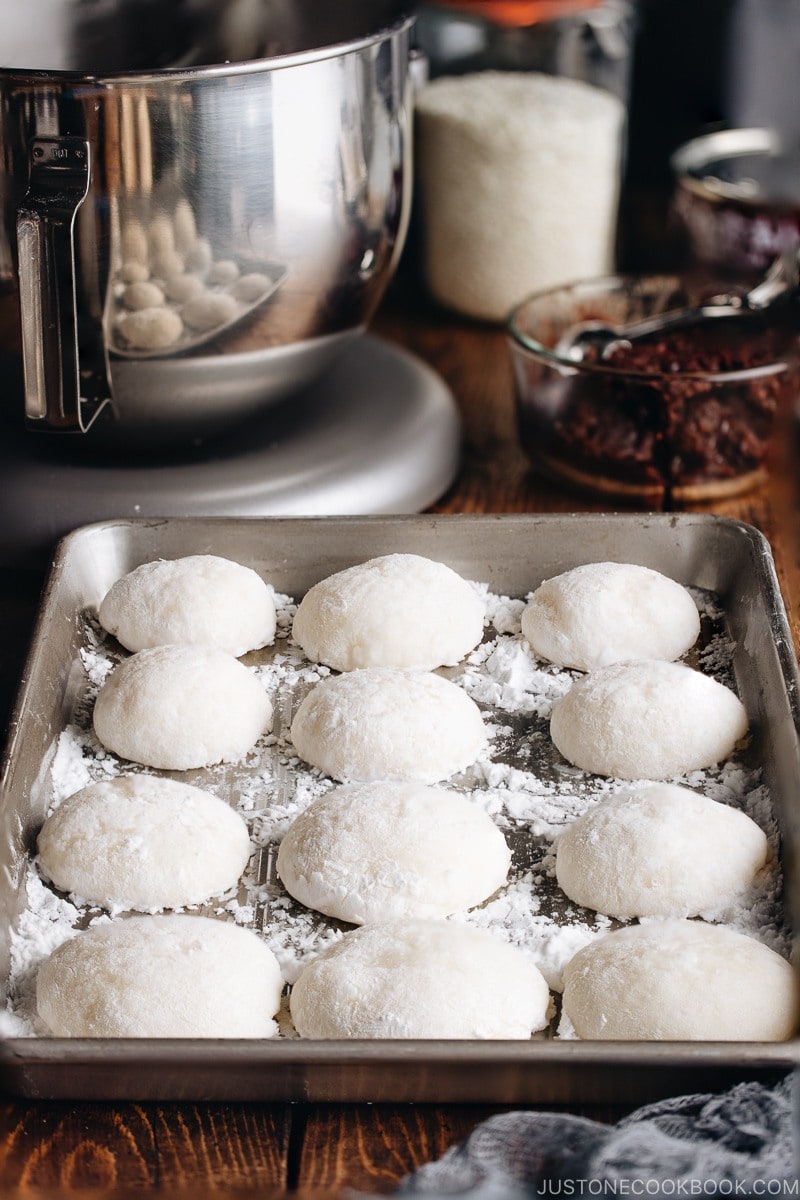
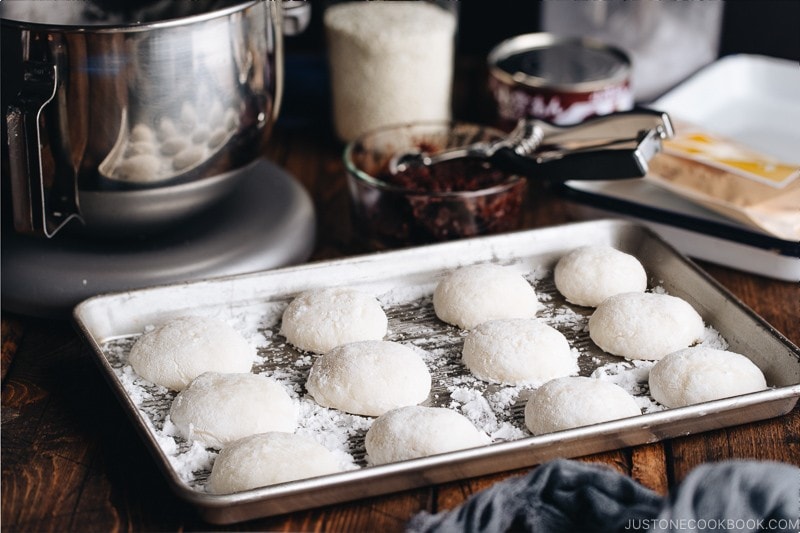
To Form into Mochi Truffles
-
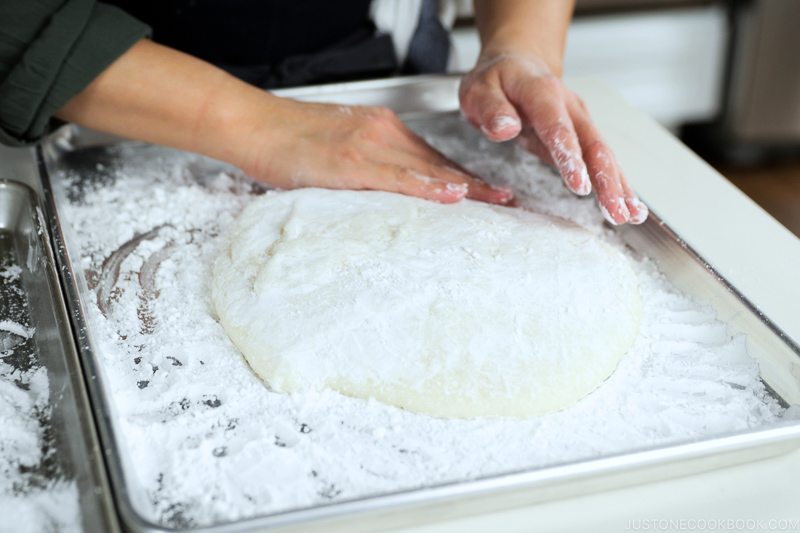
Put together two rimmed baking sheets by overlaying them with potato starch or cornstarch. Put all of the pounded mochi on one of many baking sheets. The opposite one is for protecting the mochi muffins.
-
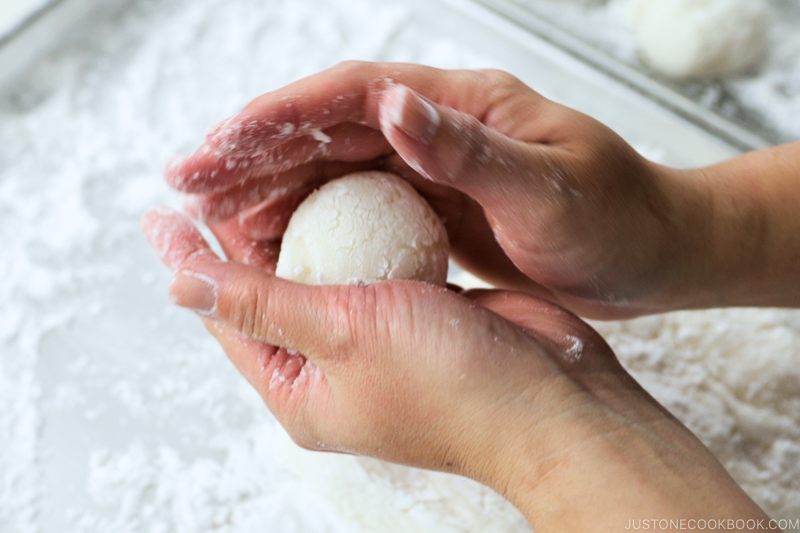
Sprinkle some potato starch on high of the freshly pounded mochi. Ensure that your fingers are fully dry and mud them with potato starch. Preserve additional starch helpful so you’ll be able to at all times mud your fingers when wanted.
-
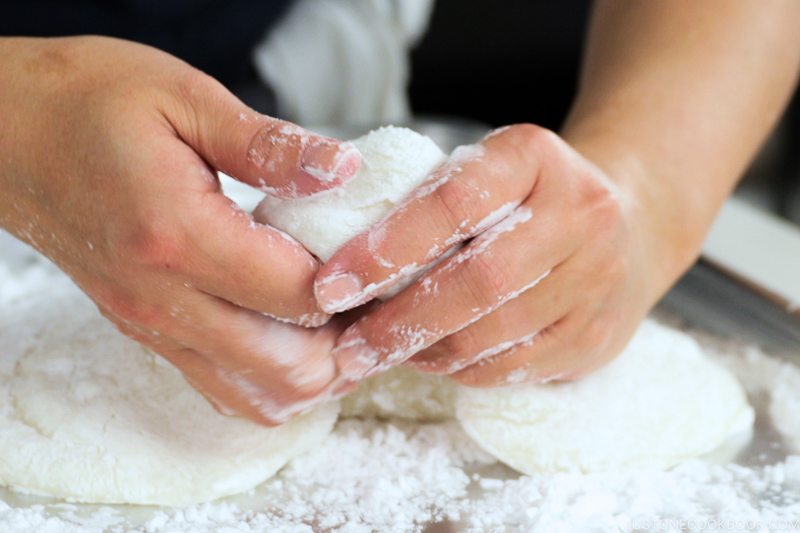
Unfold the potato starch on high of the mochi, ensuring there is no such thing as a sticky half uncovered. Whereas the mochi remains to be scorching, however cool sufficient to deal with, choose up a nook of the mochi and begin tucking within the edges beneath. Tip: Work rapidly whereas the mochi remains to be fairly heat. Because it cools down, it is going to agency up and harden and be unattainable to form.
-
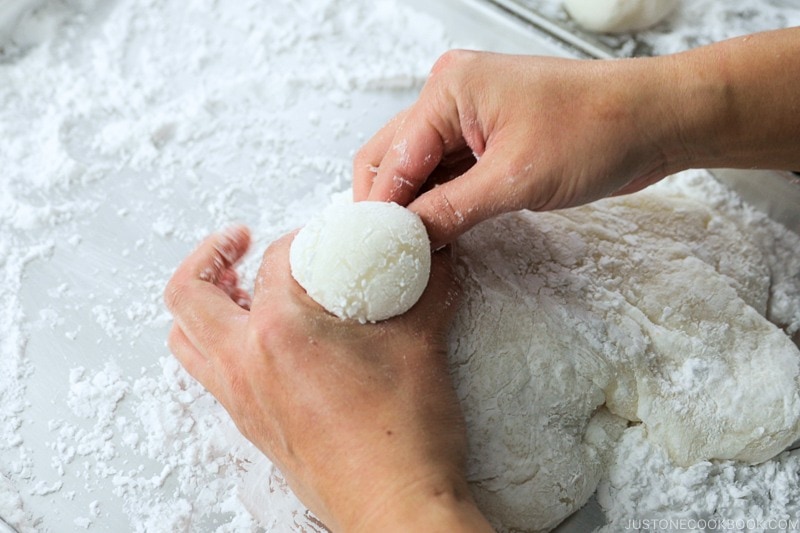
When you’ve mounded up a thick layer of mochi, make a C form together with your left index finger and thumb towards the sting of the mochi.
-
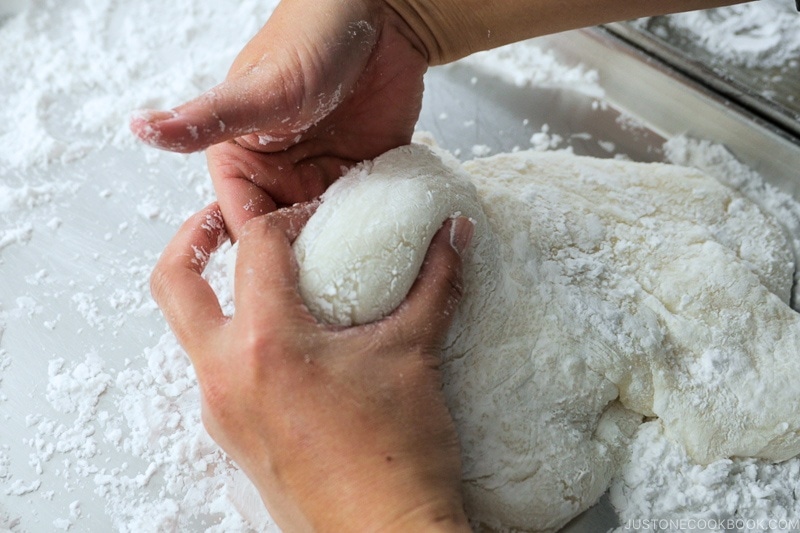
Use your proper hand to tuck in and push up the mochi beneath to create a ball form above your left C-shaped fingers.
-
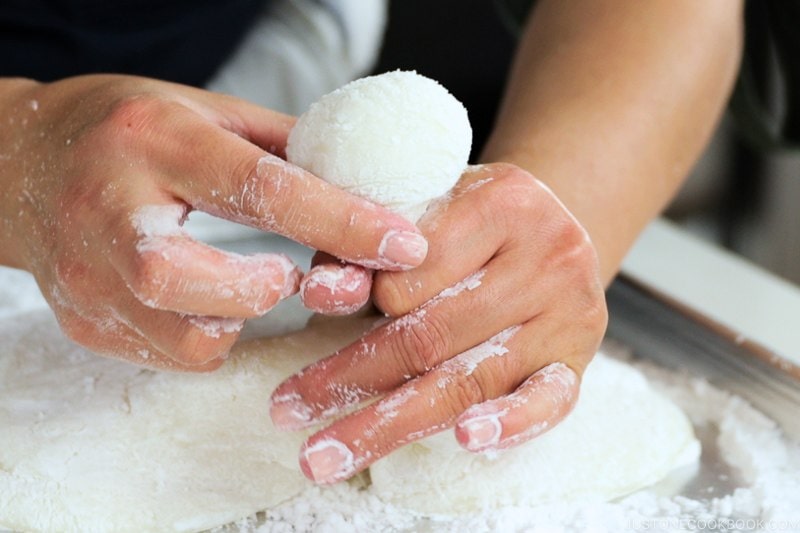
Pinch and twist: Utilizing your C-shaped fingers, pinch beneath the ball to chop off the mochi. Use your proper hand to twist off the mochi. Don’t pull the mochi, because it creates a sticky floor.
-
This picture is a foul instance. You don’t wish to pull the mochi. The sticky mochi floor seems and now your fingers get sticky while you contact it. REMEMBER: Pinch and twist. Pinch and twist.
-
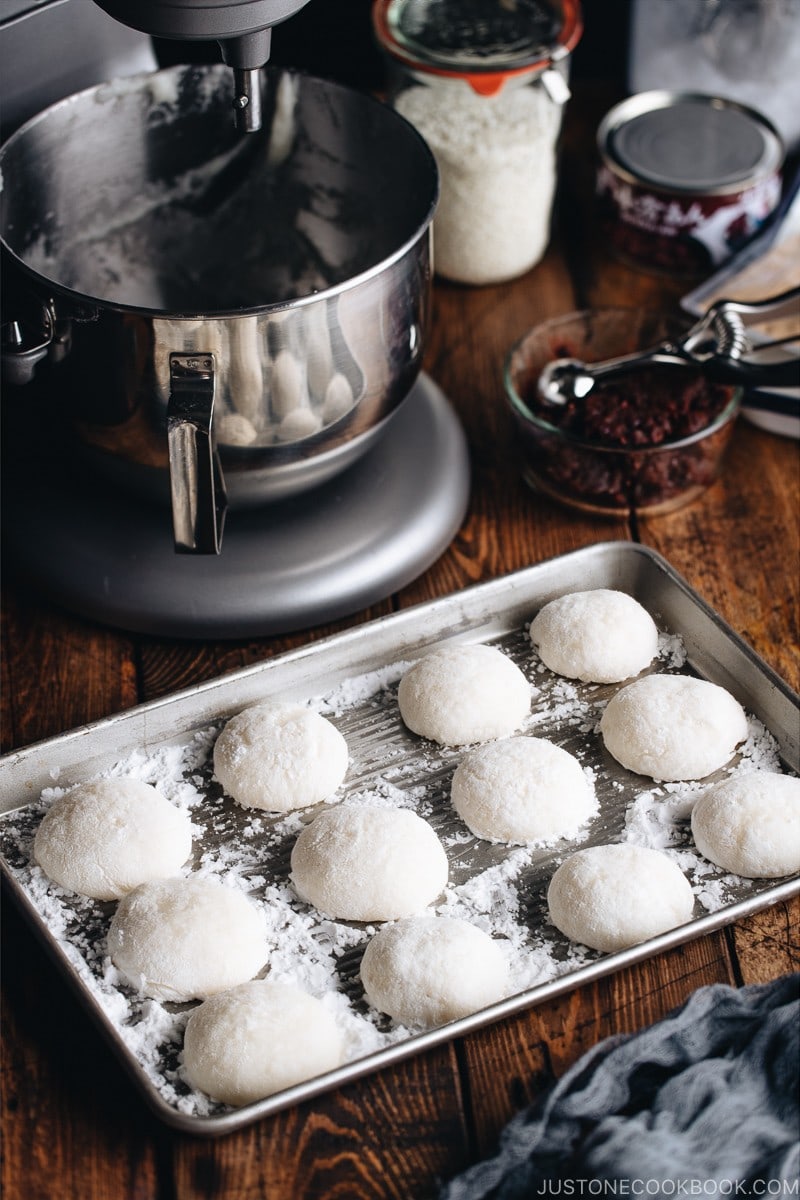
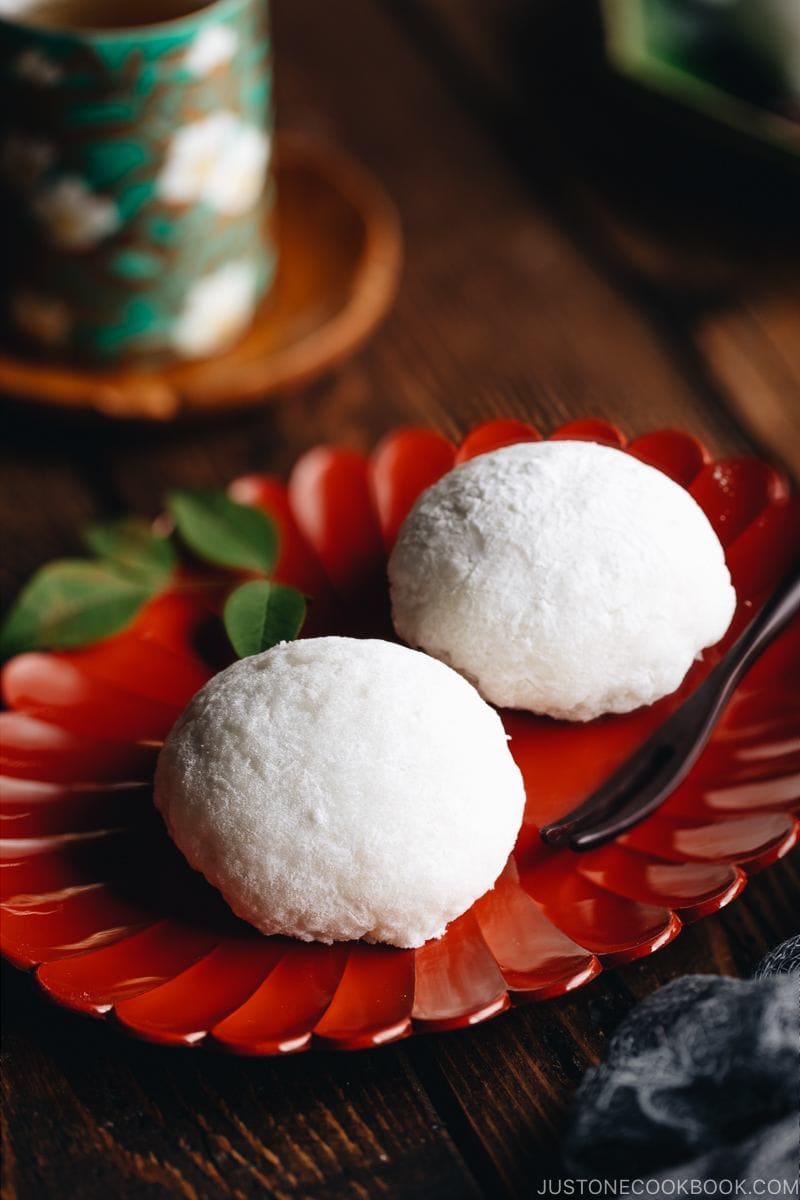
As you type the mochi muffins, place them on the opposite rimmed baking sheet. While you’re able to eat them, mud off the starch with a pastry brush or together with your dry fingers. Take pleasure in your mochi in Japanese New 12 months Soup (Ozoni) and Purple Bean Soup, or make Anko Mochi or Kinako Mochi (see beneath).
To Retailer
-
If you don’t use the mochi muffins instantly, allow them to cool fully, then cowl every one individually in plastic wrap and put in a freezer bag. Retailer within the freezer for 3 months.
To Make the Anko Mochi (optionally available)
-
Put together the Anko Mochi whereas the mochi muffins are nonetheless heat. First, flatten the muffins by urgent down with the palm of your hand.
-
Brush off the surplus starch with a pastry brush or your dry fingers. It’s essential to take away the starch, so don’t skip this step.
-
Put a scoop of candy pink bean paste (anko) within the heart of every mochi. Pull two reverse sides of the mochi out and away from the middle.
-
Pull up the perimeters and pinch the ends over the anko. Repeat for the opposite sides and pinch the ends collectively on high.
-
Calmly mud your fingers with potato starch (don’t coat too closely). Use gentle strain to pinch and seal the highest of the mochi. Repeat with the remainder of the mochi items. Serve instantly.
To Make the Kinako Mochi (optionally available)
-
Put together the Kinako Mochi whereas the mochi muffins are nonetheless heat. In a bowl, mix 2 Tbsp kinako (roasted soybean flour) and 1 Tbsp sugar and blend effectively. That is sufficient kinako combination for 2 mochi muffins.
-
Pour some scorching water in a separate bowl. Use chopsticks to dip a mochi cake within the scorching water.
-
Then, dip the mochi within the kinako combination and coat effectively. Repeat with the remainder of the mochi items. Serve instantly.
Vitamin
Vitamin Info
The right way to Make Mochi with a Stand Mixer
Quantity per Serving
% Each day Worth*
* % Each day Values are primarily based on a 2000 calorie eating regimen.
Editor’s Observe: This put up was initially revealed on December 19, 2018. It’s been re-published with extra info on December 23, 2023.